Using Forms in the VaCMS |
Forms Overview
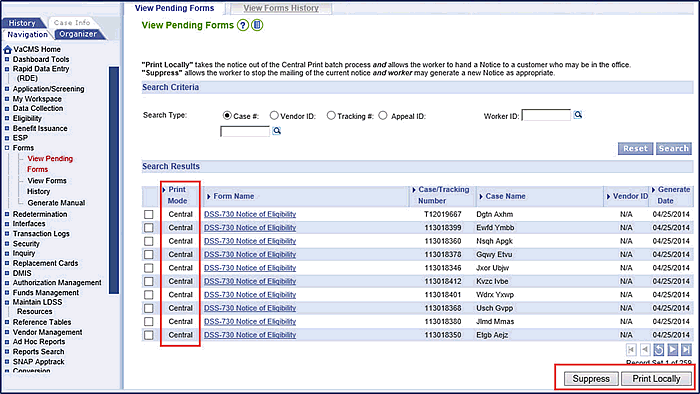
In the VaCMS, all generated forms are added to the View Pending Forms page where they can be viewed and printed. Performing certain tasks in the VaCMS automatically generates a form. Certain pages in the VaCMS also provide you the option to manually generate a form. In both situations, a new form is added to the View Pending Forms page accessible under Forms in the Left Navigation. Auto-generated and manually generated forms remain in View Pending Forms until they are printed.
While the VaCMS does not print forms for you, certain forms are marked for local workers to print while other forms are marked for Central Printing to print. See the Central Printing section below for more information.
For the forms that are marked for local office printing, you must print the forms manually from within the VaCMS. To print, the VaCMS generates the form as a Portable Document Format (PDF) file which you can then print. It is best practice to generate and print pending forms in a timely manner to avoid sending a form with outdated information.
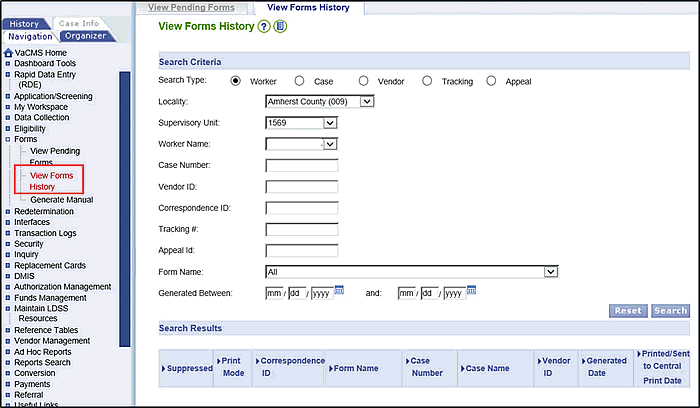
After printing a form, select its Form Name checkbox and click the Print Locally button. Doing so records the date of the form being printed and also removes the form from the View Pending Forms page to the View Forms History page. It also allows other workers and supervisors within the Unit to view the form. The date the form was printed is saved in the VaCMS as Generated Date.
Central Printing
The VaCMS will mark certain types of forms to be printed by Central Printing. Each night, all forms marked with a Print Mode of Central will be sent to Central Printing. If no action is taken by you before the batch is sent, Central Printing will print and mail the form within two business days.
Print Pending Forms
When opening a form in PDF format, it auto-populates with the information you entered into the VaCMS.
To print, follow these steps:
Click the print icon in the upper left corner of the PDF. A pop-up window displays. Choose your printer and print options, and click Print.
After printing, click the X in the upper right corner of the PDF to close the pop-up window.
Before you mail a form to a customer or vendor, you should add a comment to the case narrative (or to the facility narrative if appropriate for the form.) It is best practice to document the Correspondence ID. The comment should also include the Correspondence ID of the form.
Moving Forms from View Pending Forms to View Forms History
After printing a form, select the checkbox next to the form and click the Print Locally button. Doing so moves the form from the View Pending Forms page to the View Forms History page. It also allows other workers and supervisors within the Unit to view the form. The date the form was printed is saved in the VaCMS as Generated Date.
If you want to print a form that has been marked for Central Print, you must print the form, select the checkbox for the form, then click Print Locally to remove the form from the batch sent to Central Print. Or you can remove a form from the Central Print queue by selecting the checkbox for the form and clicking Suppress. This avoids duplicate forms being mailed to the customer or vendor.
Central Printing cannot take action on forms that are marked as Local. They must be printed and mailed by local workers. But you as a local worker can print or suppress a form that is marked for Central, as long as you do so on the day the form is generated.
Suppress: Removes the form from Pending Forms, removes the form from the Central Printing queue, and indicates within the VaCMS that the form was never printed. The form can still be found in Forms History.
Print Locally: Removes the form from Pending Forms, removes the form from the Central Printing queue, and indicates within the VaCMS that the form was printed. The form can still be found in Forms History.
Neither button can be used unless you have opened the PDF, closed the PDF, and selected the checkbox for the form.
View Pending Forms:

View Forms History

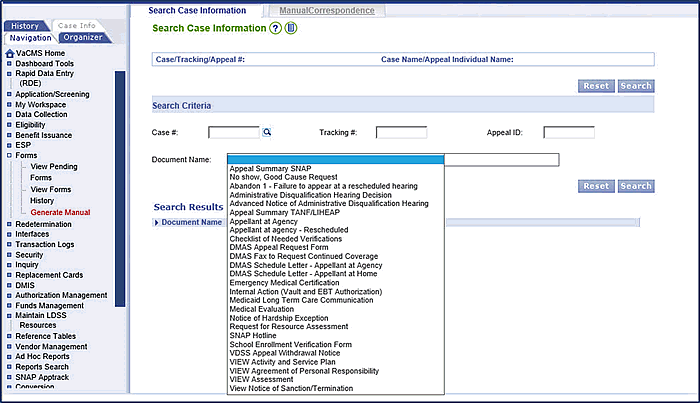
Generate Manual Forms
The VaCMS also allows you to generate a manual form that you can customize with particular information for the recipient. For example, if you want to create a customized Checklist of Needed Verifications or an Internal Action (Vault and EBT Authorization) form, you can do so.
From the Forms link in the Left Navigation, click Generate Manual. You will arrive on the Search Case Information page. Enter search criteria including Case #, Tracking #, and / or Appeal ID, then select the Document Name from the dropdown menu.

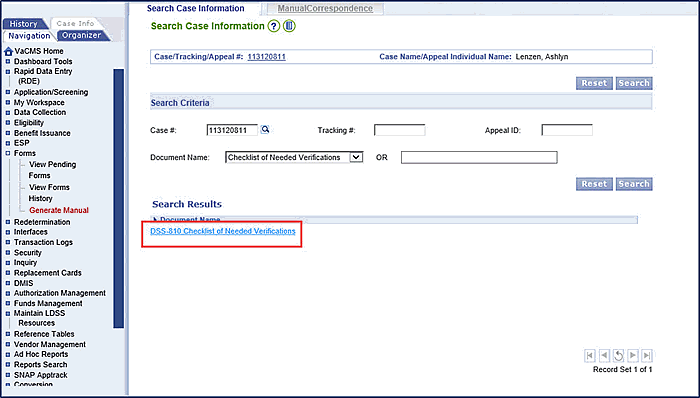
Click Search to find a sample form. Then click the hyperlink form name to visit a page allowing you to create a manual form. When you are done, click Submit and the manually generated form will appear in View Pending Forms.

Updated 04/25/2016