Adding
a TANF Benefit Adjustment |
In instances
where an underpayment of benefits has been issued, a Benefit Adjustment
can be added in the VaCMS. Adding a Benefit Adjustment for a case in the
VaCMS is accessed from the Benefit Issuance module, located in the Left
Navigation menu.
Adding a TANF
Benefit Adjustment
To add
a new Benefit Adjustment for a TANF case complete the following steps.
From the Left
Navigation, select Benefit
Issuance, then click Benefit
Adjustment.
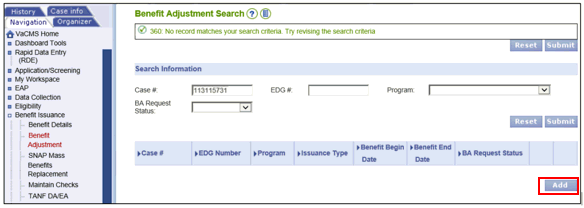
The Benefit
Adjustment Search page displays.
To create a new Benefit
Adjustment, a search must be performed before any new adjustment
can be added.

- Enter the appropriate value in the Case # or
EDG # field and click Submit.
- If a Benefit
Adjustment has already been created for the case, it will display
under the search results section.
- The Add
button becomes enabled. Click Add
to create the new Benefit Adjustment.
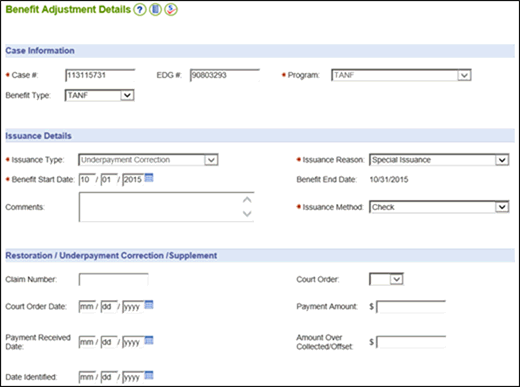
- The Benefit
Adjustment Details page displays. The Case
#, EDG #, and Program fields are populated automatically
with the case information.
- Select TANF
or TANF UP from the Benefit Type dropdown menu.
- Under the Issuance
Details section, select the applicable value from the Issuance Type and Issuance
Reason dropdown menu.
- There are
four options to select from the Issuance
Type dropdown menu:
- Replacement – This value
is not applicable to TANF, VaCMS displays an error if the
worker attempts to proceed.
- Restoration – This value
is not applicable to TANF, VaCMS displays an error if the
worker attempts to proceed.
- Supplement – This issuance
type is only applicable if the adjustment is for the current
month. If Supplement is selected for a prior month, the system
will display the following error, ‘Eligibility must be authorized
(denied or approved) for the current month prior to issuing
a supplement,’ if the worker attempts to proceed. The Issuance Reason must be
one of the following selections: Over Offset, Over Collection,
Fair Hearing, FIPS Change, Assistance Unit/Household Size
Change, Income Change
- Underpayment Correction
– This value can be selected to establish an adjustment for
any correction in misallotment of benefits and is not restricted
to the current month. The Issuance
Reason must be one of the following selections: Over
Offset, Over Collection, Fair Hearing, FIPS Change, Assistance
Unit/Household Size Change, Income Change, Special Issuance.
Note:
When benefits have not yet been issued from VaCMS for a case or the benefits
are for denied, closed, or suspended months, the Underpayment Correction Issuance Type and Special Issuance
Issuance Reason are the only values
that will not result in an error.
- Enter the Benefit
Start Date for the applicable adjustment period. When the Benefit Start Date is entered, the
Benefit End Date automatically
populates the end date of the corresponding period. If the Benefit
Start Date is not the first of the month, then the adjusted
benefit amount will be prorated.
- In the Comments
textbox, enter any supporting justification or comments regarding
the benefit adjustment. Details must be provided to support the benefit
adjustment.
For example, if the benefit adjustment
is for a case that has denied, closed, or suspended months, then
details can be provided in the Comments.
- Select a value from the Issuance
Method dropdown menu.
- Complete the relevant fields from the
Restoration / Underpayment Correction
/ Supplement section.
- Click Save
+ Continue.
Note:
If benefits were issued in a different locality for the adjustment month
than the locality completing the adjustment, a system error displays and
the worker is unable to proceed.
- The TANF
Benefit Adjustment Calculation page displays.
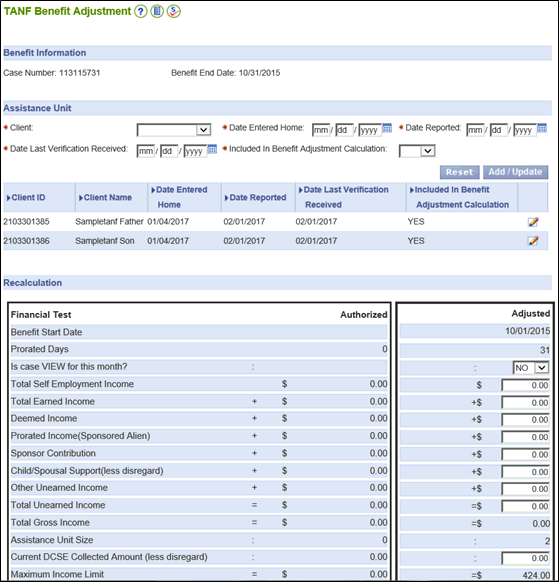
- In the Benefit
Information section the Case
Number and Benefit End Date
fields are populated automatically.
- In the Assistance
Unit section, the customers known to the case can be included
in or removed from the calculation.
Note: Add the client to the case prior to completing
the benefit adjustment.
- To update the assistance unit, complete
the following steps.
- Select the
customer from the Client
dropdown menu or click the pencil icon populated in the row with
the customer’s name.
- Enter / Update
the Date Entered Home.
- Enter / Update
the Date Reported.
- Enter the
Date Last Verification Received.
- Select Yes or No
from the Include In Benefit Adjustment
Calculation dropdown menu.
- Click Add / Update to add the customer
to the list of Household Members.
- The Recalculation
section is sub-divided into two sections.
- The left
side of the page displays Authorized
results based on the case data used to calculate the authorized
benefit amount.
- The right
side of the page displays Adjustments,
which initially contain zeroes for all values.
- To calculate the Benefit
Adjustment, enter the appropriate values into the Adjusted
section on the right side of the page.
- To complete the Special
Issuance section, follow these steps:
- Select the
Issue Entire Calculated Benefit
Amount checkbox.
- Select an
option from the Special Issuance
Reason dropdown menu.
- If Other is selected as a Special Issuance Reason then
the Comment box is enabled
and comments must be entered.
Note:
To issue the entire calculated amount, the following conditions must be
met:
- Issuance Type is Underpayment
Correction and Issuance
Reason is Special
Issuance.
- The Issue Entire Calculated Benefit
Amount checkbox is checked and one of the following
Special Issuance Reasons
are selected:
- Stop
payment
- Denied
Month
- Suspended
Month
- Other
- Click Calculate.
- The Underpayment
Amount is calculated automatically and displayed at the bottom
of the page.
- If the Underpayment
Amount is correct, click Save
+ Continue.
Note:
The left hand side of the page will be prefilled with 0s for denied, closed,
or suspended months and months prior to the application date. For Special
Issuances, upon selecting all of the customers from the Client
dropdown menu, including or removing customers from the calculation, and
clicking Add / Update, the Assistance Unit Size field in the
Recalculation section will remain
populated with 0. Only after the
Calculate button is clicked or
after the Issue Entire Calculated Benefit
Amount checkbox is checked will the Assistance
Unit Size field in the Recalculation
section adjust and populate the correct household unit size.
- The Benefit
Adjustment Wrap Up page displays.
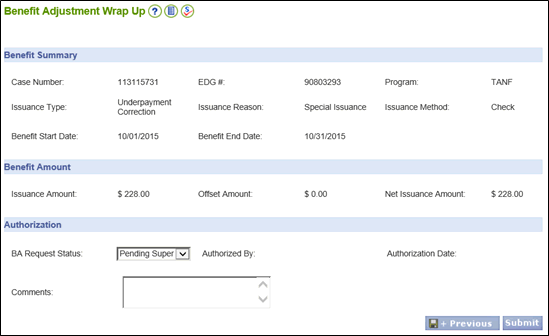
- If the Benefit
Adjustment result is correct, click Submit.
- Benefit Adjustments
can only be Approved by
a supervisor. If the worker performing the Benefit Adjustment
does not have a supervisor profile, the adjustment must be submitted
with a BA Request Status
of Pending Supervisor Approval.
Note:
After a Benefit Adjustment has been Approved, it will be included in the
next benefit batch and will no longer display on the Benefit Adjustment
Search results. To verify that benefits have been issued correctly, check
the Benefit Details for the case after the next benefit batch.
Note:
Use the Benefit Adjustment Search
page to determine whether an adjustment has been approved or not.
- From the
Left Navigation, select Benefit
Issuance, then click Benefit
Adjustment.
- The Benefit
Adjustment Search page displays.
- Enter the appropriate value in
the Case # or EDG # field and click Submit.
- If a Benefit Adjustment has already
been created for the case, it will display under the search
results section.
- Review the BA Request Status
in the search results. A BA
Request Status of Approved
indicates the Benefit Adjustment will be included in the next
benefit batch. Any other BA
Request Status means further action or approval
is required.
Updated: 06/17/2017