Entering Partial Month Income in the VaCMS |
About
A common challenge with entering an customer's income information occurs if they receive income for only part of a month; this is referred to as partial month income.
Let’s say a customer applied for Medical Assistance (MA) effective on January 1st, started a new job on January 15th and only received income for the second half of the month, accordingly. He is paid biweekly, works 40 hours per week, and makes $8.00 / hour. If you enter this partial income as you would enter regularly occurring income, the VaCMS will calculate the customer's future income incorrectly based on this partial amount.
The solution to this problem is to create two income records: one with the partial month income amount (in this example, the customer's income for January), and the other with the regular ongoing income amount (in this example, the customer's income for February).
The steps to entering partial month’s pay for all income types are below. The screenshots included highlight the important date and frequency fields that ensure proper calculation of the pay entered.
Entering Partial Month Earned Income
On the Employment – Employer page, create the first income record with the partial month income, enter the details of the employment and employer, and then:
From the Has the Client lost employment? dropdown menu, Select Yes.
In the Termination Date field, enter the last day of the month in which you are reporting a partial month's pay.
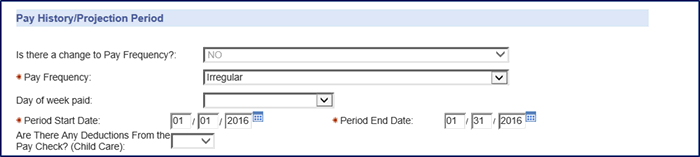
From the Pay Frequency dropdown menu for the partial month, select Irregular or Monthly (either selection will calculate the income properly).
In the Period Start Date field, enter the first day of the month in which you are reporting a partial month’s pay.
In the Period End Date field, enter the last day of the month in which you are reporting a partial month’s pay.
Click Next.
On the Employment – Pay Details page, enter all known pay details including:
In the Date Received / Expected field, enter the date the customer received their partial month's pay (this must fall within the date range created in Step 1).
In the Gross Amount field, enter the gross amount of the partial month's pay; enter other pay details if applicable.
In the Payment Indicator dropdown menu, select Final.
There will be no averaging for this month, and actual income amounts will be used.
In the Include in Projections dropdown menu, Select No.
This will prohibit the pay record to be included in future months.
Select a Pay Verification from the dropdown menu.
Click Add.
Click the Save + Add Employment button to create a new employment record. This will return you to the Employment – Employer page where you can enter the details of the employment, this time indicating that the employment is ongoing (*or has ended, if applicable).
On the Employment – Employer page, re-enter the details of the employment with the following changes from the original entry:
In the Effective Begin Date field, enter the first of the month of the first full month's pay (the month immediately following the partial month entered previously).
From the Has the Client lost employment? dropdown menu, select No (*unless the employment has indeed ended).
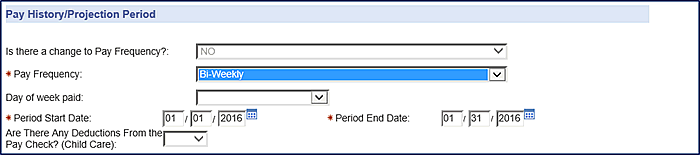
From the Pay Frequency dropdown menu, select the pay frequency for the ongoing employment.
In the Period Start Date field, enter the first day of the month of the ongoing employment (same as the Effective Begin Date at the top of this page).
In the Period End Date field, enter the date appropriate for the ongoing pay details you are entering.
Click Next.
Entering Partial Month Self Employment Income
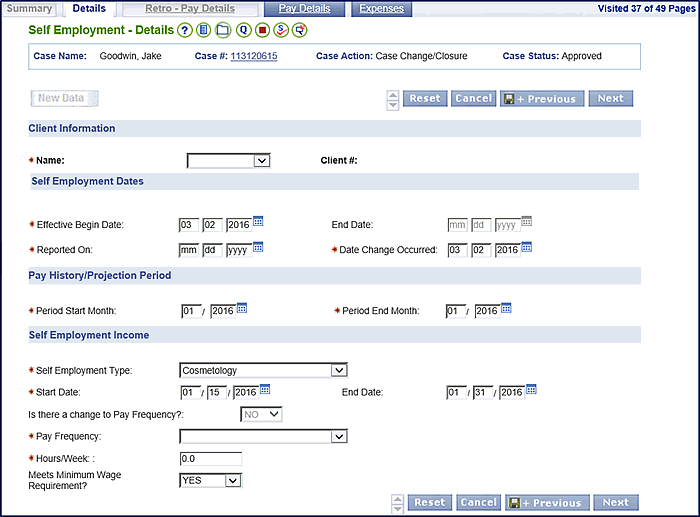
On the Self Employment – Details page, enter all known details of the self employment, including the Effective Begin Date, Self Employment Type, Start Date (same as Effective Begin Date), and:
The Period Start Month and Period End Month fields should be the same month and year, in order to represent a single full-month range.
The End Date for this record should be the last day of the partial month (this indicates this particular employment is no longer ongoing).
Complete the Self Employment Income section, and from the Pay Frequency dropdown menu for the partial month, select Irregular or Monthly (either selection will calculate the income properly).
On the Self Employment – Pay Details page, enter:
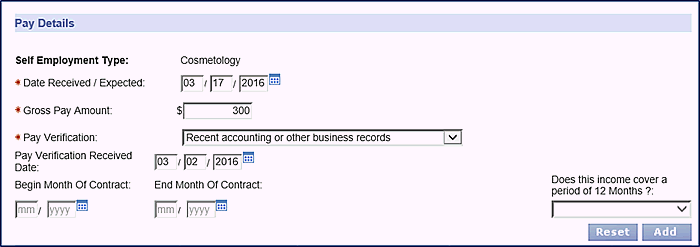
The Date Received / Expected as the date the partial month income was received.
Enter the partial income amount in the Gross Pay Amount field.
Select the Pay Verification from the dropdown menu.
Enter the Pay Verification Received Date.
Click the Add button to add the pay details, and repeat if multiple pay details should be entered for the partial month.
Click Next to enter expenses if applicable, or, click Save + Add Self Employment to create a new employment record.
Create a second record for the ongoing self-employment with the same details as the previous record, except:
In the Effective Begin Date field, enter the first day of the month after the partial income has ended.
In the Reported On field, enter the date the customer reported the change.
The new Period Start Month should be the first day of the month after the partial income has ended.
Enter the Period End Month as appropriate for the self-employment.
Enter the Start Date as the same date as the Effective Begin Date.
Do not enter an End Date unless the self-employment has ended.
On the Self Employment – Pay Details page (and Self-Employment – Expenses page, if applicable), enter the ongoing self-employment pay details.
The final result will be two separate self-employment records for the same self-employment.
Entering Partial Month Unearned Income
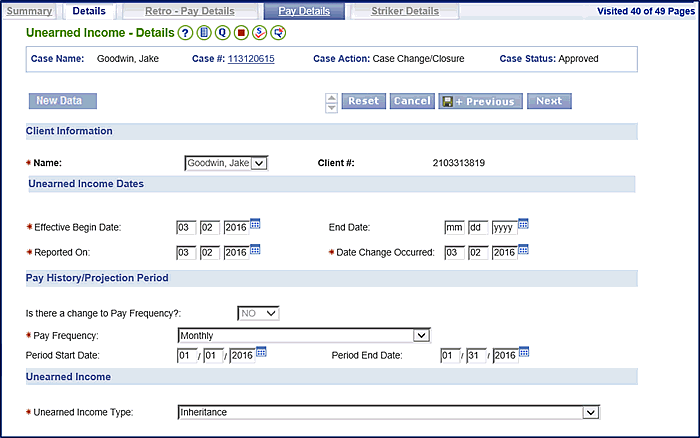
On the Unearned Income – Details page, create the first unearned income record with the partial month income, including:
Select the customer name from the Name dropdown menu.
From the Effective Begin Date field, select the date the Unearned Income started.
Enter the Reported On field, enter the date the customer reported the change.
From the Pay Frequency dropdown menu, select Monthly.
In the Period Start Date field, enter the first day of the month in which you are reporting a partial month’s pay.
In the Period End Date field, enter the last day of the month in which you are reporting a partial month’s pay.
Select the Unearned Income Type from the dropdown menu.
Click Next.
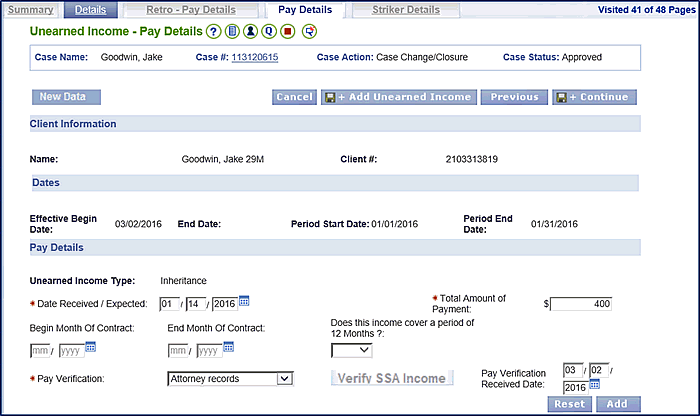
On the Unearned Income – Pay Details page, enter all known details of the unearned income, including:
The Date Received / Expected.
The Total amount of payment.
The Pay Verification.
Click the Add button and repeat if multiple entries are needed for the partial month.
Click the Save + Add Unearned Income button to create a new unearned income record.
Create a second unearned income record with the ongoing income, including:
The Effective Begin Date should be the first day of the month after the partial income ended.
From the Pay Frequency dropdown menu, select the response applicable to the reported unearned income.
The Period Start Date should be the first day after the previous entry's Period End Date.
In the Period End Date field, enter the date appropriate for the ongoing unearned income pay details.
Select the Unearned Income Type from the dropdown menu.
Click Next.
On the Unearned Income – Pay Details page, enter all known details of the unearned income, including:
The Date Received / Expected.
The Total amount of payment.
The Pay Verification.
Click the Add button and repeat if multiple entries are needed for the ongoing income.
The final result will be two separate unearned income records .
Updated 04/25/2016