|
Medical Assistance |
Entering Pregnancy Details |
About
Pregnancy impacts eligibility results, so it is important to enter pregnancy details correctly in the VaCMS. The steps for entering pregnancy details as a part of an application are different from the steps for entering pregnancy details as a part of a case update . This guide is divided into two sections accordingly.
How to Enter Pregnancy Information for an Application
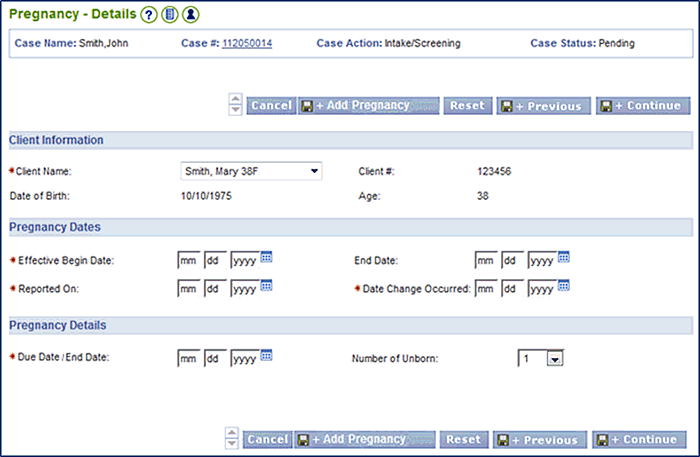
In an application, the Pregnancy Details page is used to capture information about possible pregnancies for any female 11 years old and above who is associated with the case. This page contains three sections: Client (Individual) Information, Pregnancy Dates, and Pregnancy Details.
When completing the application pages, you must indicate that someone in the household is pregnant. To do so, select Yes from the Pregnancy dropdown menu on the Questions page (this triggers the Pregnancy Details page).
On the Pregnancy Details page, follow these steps:
In the Individual Information section, select the name of the individual in the household who is pregnant from the Client Name dropdown menu.
Go to the Pregnancy Dates section.
The system uses the Effective Begin Date (which auto-populates) in the pregnancy screen in the same way as any other screen - to determine if the record needs to be used for the given month.
The Reported On field defaults to the current date. If different from the current date, enter the date that the pregnancy was reported to the agency.
The Date Change Occurred field defaults to the current date. If different from the current date, enter the date when the client learned she was pregnant (or the pregnancy was terminated).
If the pregnancy has ended (either due to miscarriage or birth), enter the date in the End Date field.
Go to the Pregnancy Details section.
Enter the Due Date / End Date (this is the date the baby is due to be born).
Select the number of unborn from the Number of Unborn dropdown menu.
Note: If any other females in the household are pregnant, click the Save + Add Pregnancy button and enter information into the same fields as entered above.
When you are done entering pregnancy information, click Save + Continue.
The Individual Information - EDG Summary displays. Click Next to continue.
Continue to enter information into the respective pages until the Wrap-Up Run Eligibility page displays. Click Next to Continue.
Review the information displayed on the Wrap-Up Eligibility Summary page and continue through the Certification / Authorization process.
How to Add Pregnancy Information for an Active Case
When a woman, belonging to the household of an ongoing case submits information resulting in partial review for pregnancy Medicaid benefits, the procedure for capturing the pregnancy information is as follows:
Select Case Action from the Data Collection item located in the Left Navigation menu. The Case Action page displays.
Enter the Case #.
Select Case Change / Case Closure from the What action do you want to perform? dropdown menu.
Click Next to continue.
The Case Action Confirmation page displays.
Select Yes from the Do you wish to continue? dropdown menu.
Click Next to continue.
Select Questions from the Left Navigation menu.
The Household Clients – Questions page displays.
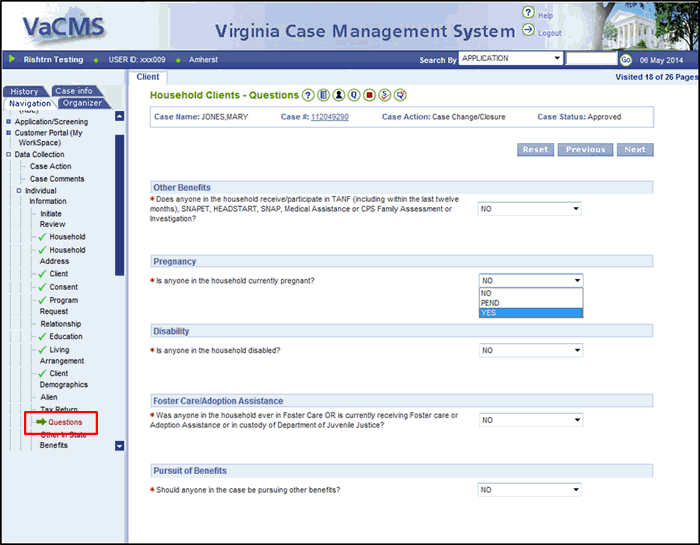
In the Pregnancy section of the Household Clients – Questions page, select Yes from the Is anyone in the household currently pregnant? dropdown menu.
The Pregnancy Details page displays.
In the Individual Information section, select the name of the individual in the household who is pregnant from the Client Name dropdown menu.
Go to the Pregnancy Dates section.
The system uses the Effective Begin Date (which auto-populates) in the pregnancy screen in the same way as any other screen - to determine if the record needs to be used for the given month.
The Reported On field defaults to the current date. If different from the current date, enter the date that the pregnancy was reported to the agency.
The Date Change Occurred field defaults to the current date. If different from the current date, enter the date when the client learned she was pregnant (or the pregnancy was terminated).
If the pregnancy has ended (either due to miscarriage or birth), enter the date in the End Date field.
Go to the Pregnancy Details section.
Enter the Due Date / End Date (this is the date the baby is due to be born).
Select the number of unborn from the Number of Unborn dropdown menu.
Note: If any other females in the household are pregnant, click the Save + Add Pregnancy button and enter information into the same fields as entered above.
When you are done entering pregnancy information, click Save + Continue.
The Individual Information - EDG Summary displays. Click Next to continue.
Note: In order to have the mother receive MA benefits, you will need to complete the Program Request page.
Continue to enter information into the respective pages until the Wrap-Up Run Eligibility page displays. Click Next to Continue.
Review the information displayed on the Wrap-Up Eligibility Summary page and continue through the Certification / Authorization process.
Click Next to continue. The case is now updated with current information.
Continue through the MMIS and FFM pages as needed.
Note: The VaCMS will only run eligibility for the future months in eligibility and the worker may have to authorize some months of eligibility directly in MMIS.
Updated 04/25/2015