
Overview
There are two file clearance scenarios you will encounter when you perform a Manual Conversion in the VaCMS:
No individuals on a MMIS case are known to the VaCMS.
One or more individuals on a MMIS case are already known to the VaCMS.
The process for performing a Manual Conversion differs depending on which route you choose.
Note: Pilot agencies will not be able to manually convert SNAP and TANF cases from ADAPT statewide go-live
Performing a Manual Conversion for an Individual Not Known to the VaCMS
You will follow this process if a customer exists on an open MMIS case but is not currently known to the VaCMS:
Initiate an application through Application / Screening.
On the Register Family page, select Manual Conversion from the Source dropdown menu.
Enter the Source Application Date (For Manual Conversion). This is the date of the most recent application, renewal, or change report from the Source system.
Complete the page, then click Save + Continue.
Complete the Application / Screening process and assign the case to the appropriate worker.
Navigate to the Case Action page in Data Collection.
Enter the T-number of the application you want to convert in the Case or Application Screening # field.
Select Intake / Screening from the What Action Do You Want to Perform? dropdown menu.
Click Next, then proceed through the driver flow until you reach the Client Information page.

There are two fields in the Demographic Information section that only display when performing a Manual Conversion. They are: Is this client being manually converted? and Current Renewal Date.
Select a response from the Is this client being manually converted? dropdown menu.
Enter the upcoming renewal date in the Current Renewal Date field.
Continue with data collection until you reach the Household Clients – Questions page.
The Other Benefits question defaults to Yes during Manual Conversion. Because a manually converted customer already has coverage, leave this response as Yes.
Click Next.
The Other Benefits – Details page displays.
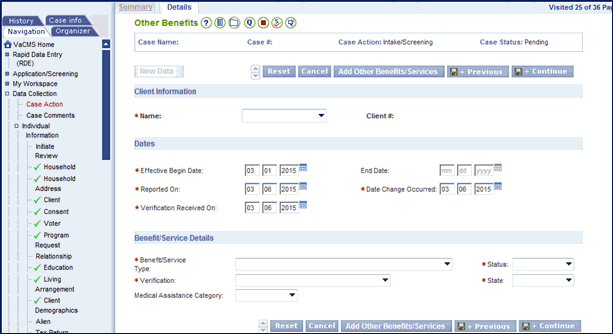
Enter the details of the customer’s current Medical coverage.
In the Dates section, be sure to enter an End Date that is the last day of the Manual Conversion month. This ensures the customer will be closed benefits for the conversion month.
Example: If you’re performing a Manual Conversion in August 2015, the End Date would be 8/31/2015. The individual will be closed for August.
Note: customer’s coverage for the conversion month is not retroactively closed. In other words, although the VaCMS closes their coverage effective the conversion month, their MMIS coverage continues through the end of the Conversion month.
Click Next to complete the Data Collection driver flow and run eligibility. Eligibility will be closed for the month of the Manual Conversion, and will be determined as of the first of the next month.
Example: If you’re performing a Manual Conversion in August 2015, eligibility will run effective 9/1/2015.
Authorize results.
Performing a Manual Conversion on a Case Known to the VaCMS
You can also perform a Manual Conversion for a case with one or more individuals who are already in the VaCMS. For example, an ABD customer who was evaluated for a MAGI-based Medicaid program before being entered into MMIS. You will manually convert the customer’s case in the VaCMS, make the appropriate changes, and run eligibility.
The process for performing a Manual Conversion on a case already known to the VaCMS differs depending on case status.
Initiate an application through Application / Screening.
On the File Clearance – Associated Cases page, click the radio button next to the case number you want to associate the Manual Conversion application to.
Select Yes from the Associate dropdown menu.
Select Change / Add a Person from the Convert Application To dropdown menu.
Click Next and complete Application / Screening process.
From the Left Navigation menu, select Case Action.
Enter the original case number
Select Case Change / Closure from the What Action Do You Want to Perform? dropdown menu.
Proceed through Data Collection until you reach the Other Benefits – Details page.
In the End Date field, enter the last day of the conversion month.
For example: if you are converting a case in August, enter 8/31/2015 in the End Date field. This ensures eligibility will not run for the conversion month.
Complete the Other Benefits – Details page, then click Save + Continue.
Complete Data Collection and run eligibility.
Authorize results.
Initiate an application through Application / Screening.
On the File Clearance – Associated Cases page, click the radio button next to the case number you want to associate the Manual Conversion application to.
Select Yes from the Associate dropdown menu.
Click Next and complete Application / Screening process.
From the Left Navigation menu, select Case Action.
Enter the original case number.
Select Intake / Screening from the What Action Do You Want to Perform? dropdown menu.
Proceed through Data Collection until you reach the Other Benefits – Details page.
In the End Date field, enter the last day of the conversion month.
For example: if you are converting a case in August, enter 8/31/2015 in the End Date field. This ensures eligibility will not run for the conversion month.
Complete the Other Benefits – Details page, then click Save + Continue.
Complete Data Collection and run eligibility.
Authorize results.
Updated 10/03/2016