Reinstating a Program |
About
The VaCMS allows you to reinstate a closed or denied case or program under certain circumstances. There are multiple scenarios that exist where this action may be appropriate. This document explains how to reinstate a closed or denied case.
Note:
Denied Child Care programs cannot be reinstated.
Closed Child Care programs can only be reinstated when there are no other active programs on the case, and no other programs are selected for reinstate.
Denied or Closed MA programs cannot be reinstated if an active Child Care program exists on the case.
In instances where SNAP or TANF cases are closed due to late renewals, there are special considerations while reinstating the cases. Please refer to the Reinstating SNAP or TANF Cases that are Closed for Non-Receipt of Renewals in VaCMS IBP for steps to reinstate cases that were closed because of an overdue renewal.
This QRG includes three sections specific to different reinstate scenarios:
Reinstating a Program
MA Renewal Received Within Grace Period
Reinstating SNAP Cases that were Auto-Closed Due to Non-Receipt of Interim Reports in VaCMS
Refer to the section that is applicable to the reinstate scenario you are completing.
Denying and closing are specific to particular phases in the VaCMS program lifecycle. If you need more information about this process, please see the Quick Reference Guide titled “Denying Applications, Denying Programs and Closing Programs.”
Reinstating a Program
A closed or denied program may be reinstated for several reasons, including the following:
· The customer failed to provide information needed to run eligibility during a case change or redetermination / renewal and later provides that information.
· The agency received a late interim report or renewal within the grace period and it must be processed.
· The Fraud Unit initially reports a customer as out of compliance, but later confirms the customer is compliant.
The steps to reinstate a case or program(s) on a case are as follows:
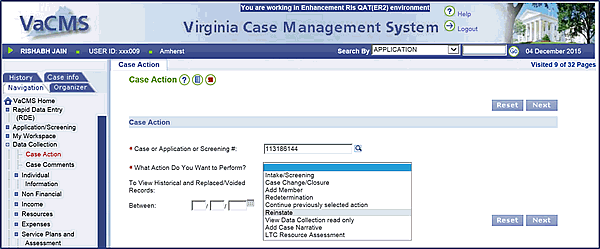
1. From the Left Navigation, click on Data Collection, then Case Action.
2. Enter the case number and select Reinstate from the What action do you want to perform? dropdown menu. Click Next.
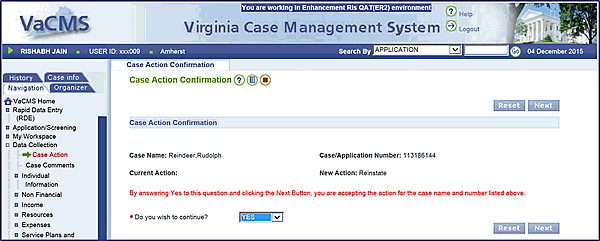
3. Select Yes from the Do you wish to continue? dropdown menu on the Case Action Confirmation page.
4. Click Next.
5. The Initiate Reinstate page displays.
a. All programs on the case with a status of Closed or Denied will be displayed along with their Program Request Date and Program Status from the most recent program request.
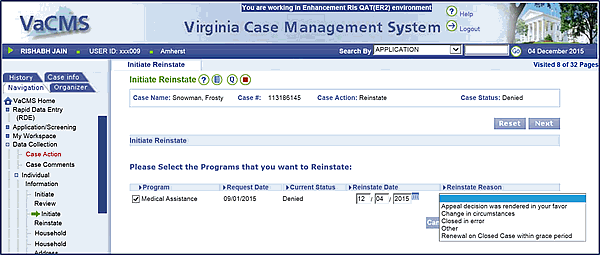
6. Check the box(es) of the program(s) for reinstatement.
7. “Reinstate Date” will default to the current date.
a. If needed, modify the Reinstate Date. The Reinstate Date must be after the Request Date, and cannot be a future date.
8. Select the Reinstate Reason from the dropdown menu.
9. Click Next.
a. The Household Information page displays. Complete the necessary steps to update the case.
10. Run eligibility and authorize / certify results as appropriate.
11. For Medicaid cases, send the information from the VaCMS to MMIS to complete the reinstatement.
12. The Notice of Eligibility is generated and marked for Central Print. No action is necessary.
a. If you prefer, you can print the form and mail it to the customer.
b. Be sure to mark the form as Printed Locally so it is not also printed by Central Print.
Special Scenario: MA Renewal Received Within Grace Period
For Medical Assistance (MA) renewals, customers must return the renewal form or verifications by the due date. If the customer does not return their renewal form by cutoff in the month their renewal is due, the worker closes the program (see the QRG Overdue Renewals-Closing the MA Program).
If MA is the only program included on that case, the case status will simultaneously change to closed. If, however, during the 3-month grace period (three months from the effective date of closure) the customer returns the completed MA renewal form, the worker will need to reinstate the program so the renewal can be completed. However, the process for reinstating is somewhat different in this particular scenario.
Please Note: The customer may submit their renewal via the Call Center or CommonHelp, or a worker may enter it through RDE based on a paper renewal form. Self Direct may fully or partially process the renewal. Check your alerts to see whether Self Direct picked up a renewal and where to pick up the renewal for processing or look for the renewal in MyWorkspace.
Regardless of how the renewal is received, the worker may need to pick up the renewal from any point in the process below and finish any remaining steps.
Steps to Complete the Reinstatement for a Redetermination:
From Left Navigation, go to Data Collection > Case Action.
From the Case Action dropdown menu, select Redetermination and click Next.
EXCEPTION: If the case was not closed properly (see the Overdue MA Renwals-Closing the MA Program QRG), you will not be able to complete the reinstatement using Redetermination. Select Reinstate. DO NOT CHANGE ANY FIELDS. Run eligibility and authorize the case. Next, go to Case Action and select Redetermination and complete the redetermination.
On the Case Action Confirmation page, select Yes from the Do you wish to continue? dropdown menu.
On the Initiate Review page, select the checkbox next to each EDG for which you would like to initiate a Reinstatement / Redetermination.
Enter
the date on which you received the renewal in the Packet Received
/ Ex Parte Date.
Note: If the customer submitted the renewal through CommonHelp
or the Call Center, or the renewal was entered through RDE, this date
may be pre-populated.
Click Next.
Based on the renewal, enter any new or updated information on the respective pages in Data Collection.
When
you reach the Program Request Summary page, click the edit
icon.
Note: On this page, the Reinstatement questions and fields should
be pre-populated as follows (if the fields do not reflect these answers,
update accordingly):
Is this a Reinstatement? = Yes
Reinstate Date = equal to the Packet Received / Ex Parte Date.
Reinstate Reason = Renewal on Closed Case within grace period.
Click Save + Continue.
Continue entering any new or updated information for the customer on the respective pages in data collection.
Run eligibility, authorize results, and send the transactions to MMIS.
Special Scenario: Reinstating SNAP Cases that were Auto-Closed due to Non-Receipt of Interim Reports in VaCMS
Below are the steps for reinstating SNAP cases that were auto-closed due to non-receipt of interim reports:
Late Interim Report Scenario: For example, SNAP cases with an interim report due February that auto-closed effective February 28 due to non-receipt of the interim report, workers must conduct a Reinstate case action in VaCMS to ensure benefits are accurate. For other months that fit within this scenario, workers must follow the same logic provided.
From the Left Navigation, select Data Collection and Case Action.
Enter the case number and select Reinstate from the What action do you want to perform? dropdown menu. Click Next.
On the Case Action Confirmation page, select Yes from the Do you wish to continue? dropdown menu.
Click Next.
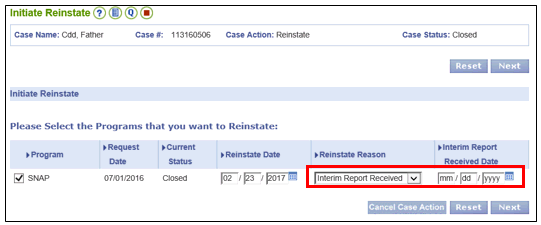
On the Initiate Reinstate page:
Select Interim Report Received for the Reinstate Reason.
Enter the Interim Report Received Date.
Click Next.
Proceed through the driver flow in Data Collection and enter any changes based on the information in the Interim Report.
Run eligibility.
Certify and Authorize the results.
Updated 03/31/2019