Returned, Cancelled, and Lost/Stolen/Mutilated Checks |
About
There are situations where checks may not be deposited smoothly into a client’s account. In some instances checks may be returned to the Home Office Financial Processing Unit (FPU) or the local agency due to an incorrect address or a client moving without notifying the agency of their correct address. There may also be instances where a local agency requests that the Home Office FPU stop payment for a lost, stolen or mutilated check. This Quick Reference Guide (QRG) provides an overview of the specific steps that Home Office FPU Workers and local agency workers need to follow to ensure that a new check is mailed to the appropriate address or to stop payment for a check. This QRG also includes an appendix to provide definitions of related finance codes and alerts referenced throughout the document.
Check Returned to Home Office Financial Processing Unit (FPU)
Home Office FPU and local agency workers need to work together to ensure proper routing when a check is returned to the Home Office. The instructions below provide an overview of the process.
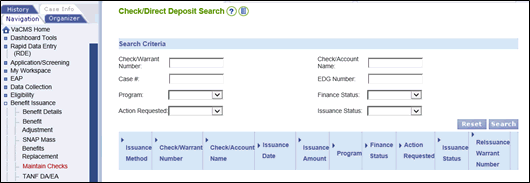
Home Office FPU Worker:

Note: VaCMS generates an alert (Alert 10) to notify the local agency worker that a check was returned to the FPU.

Local Agency Worker, upon receipt of the alert (Alert 10):
Note: If the local agency worker does not complete the Check/Direct Deposit Action by selecting an Action Requested within 10 days, VaCMS generates an alert (Alert 114) to notify the Home Office FPU worker to cancel the check.
Note: VaCMS generates an alert (Alert 114) to notify the Home Office FPU worker of the action requested.
Note: When applicable, remember to also update the address in Data Collection for an open case or from the Case – Search / Summary page for a closed case.
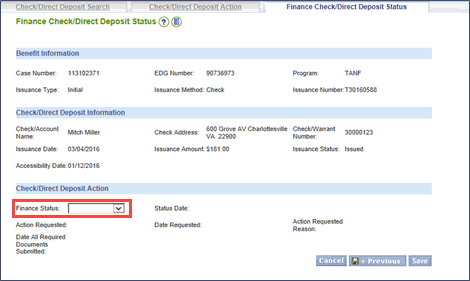
Home Office FPU Worker, upon receipt of the alert (Alert 114):
Note: VaCMS disposes the alert (Alert 114) that notified the Home Office FPU worker of the action requested.
Note: If the Cancelled status is selected, the VaCMS generates an alert (Alert 115) to notify the local agency worker that the check was cancelled by the Home Office FPU worker. Upon receipt of the alert, the local agency worker should follow steps 1 – 6 below:
If the Finance Status is Cancelled, the local agency worker:
Note: If Re-Issuance is Yes, Check / Warrant is generated overnight with Issuance Type of Replacement. Entry will display in Benefit Details and Maintain Checks the following morning.
Note: Remember to also update the address in Data Collection for an open case or from the Case – Search / Summary page for a closed case.
If a check was mailed to the wrong address and is returned to the local agency, the local agency should mail the check to the correct address. If the local agency worker cannot mail the check to the correct address, then the check should be sent to the Home Office FPU. Action in the Maintain Checks link of the VaCMS is not required.
Note: Remember to also update the address in Data Collection for an open case or from the Case – Search / Summary page for a closed case.
If the local agency is contacted by a client for a check that has been lost, stolen, or mutilated, refer to the Lost, Stolen, or Mutilated section below.
There may be instances when a local agency needs to submit a request to the Home Office FPU to stop payment for a check that has been lost, stolen, or mutilated. The local agency worker and Home Office FPU Worker each must complete steps to stop payment.
Local Agency Worker:
Note: VaCMS generates an alert (Alert 114) to notify the Home Office FPU worker of the action requested.
Home Office FPU Worker, upon receipt of the alert (Alert 114):
Note: VaCMS disposes the alert (Alert 114) that notified the Home Office FPU worker of the action requested.
Note: VaCMS generates an alert (Alert 115) to notify the local agency worker that the payment was stopped for the check by the Home Office FPU worker.
Local Agency Worker upon receipt of the alert (Alert 115):
Note: If Re-Issuance is Yes, the Check / Warrant is generated overnight with Issuance Type of Replacement. Entry will display in Benefit Details and Maintain Checks the following morning.
Note: Remember to also update the address in Data Collection for an open case or from the Case – Search / Summary page for a closed case.
| Code | Action Requested |
| SL | Stop Payment – Check Lost |
| SS | Stop Payment – Check Stolen |
| SM | Stop Payment – Check Mutilated |
| RN | Remail - New Address |
| RS | Remail - Same Address |
| CL | Cancel |
| Code | Action Requested Reason |
| MC | Mutilated check - not legible/cannot be processed |
| NR | Payee did not receive check |
| RL | Check received, then lost/stolen |
| RE | Check received, endorsed, then lost/stolen |
| CD | Check destroyed; more than half unrecoverable |
| WA | Check mailed to wrong address |
| SR | Check cashed in stored, then robbed/destroyed in fire |
| SC | Special circumstances |
| CS | Cashed check copy sent to LWA |
| FI | Forgery initiated |
| OT | Other |
| Code | Finance Status |
| SC | Payment Stopped – Affidavit Received / Check Cashed |
| SN | Payment Stopped – Affidavit Received / Check Not Cashed |
| OT | Payment Stopped - Other Certified Documents Received |
| RF | Returned to FPU |
| CD | Cancelled |
| RN | Remailed-New Address |
| RS | Remailed-Same Address |
| Code | Reason Not Re-Issued |
| AR | Client's Request |
| DT | Death of Case Name/Caretaker Relative |
| DE | Death Of Only Eligible Household Member |
| UL | Moved Or Unable To Locate |
| LC | Local Check Issued * |
| ER | Application approved in error |
| LO | Not A Resident Of This Locality |
| Code | Reason Not Re-Issued |
| AR | Client's Request |
| DE | Death Of Only Eligible Household Member |
| UL | Moved Or Unable To Locate |
| LC | Local Check Issued |
| ER | Application approved in error |
| AD | Application Received After Deadline |
| IV | Failed To Provide Income Verification |
| NF | Failed To Provide Non-Financial Verification |
| MI | Income Exceeds Maximum Income Level |
| AS | Ineligible Alien Status |
| LA | Ineligible Living Arrangement |
| AH | Member Of Another Household |
| NE | No Heating Expense |
| LO | Not A Resident Of This Locality |
| NR | Not Responsible For Heating/Cooling Bills Or Equipment |
Updated 02/24/2017