Entering a Claim for a Case Not Known to VaCMS |
Overview
Currently, the VaCMS does not allow users to enter a new claim if there is an overpayment on a case for month(s) issued from ADAPT and the case is not known in VaCMS. Workers must add the case and all individuals who were on the case, or should have been on the case, to VaCMS to enter the claim.
Note: For established claims in ADAPT that need to be converted but have no case in VACMS or there is a case in VaCMS that does not include SNAP/TANF, please refer to the Manually Converting a Claim from ADAPT to the VaCMS QRG for more information on manually converting claims.
Entering a Claim for a Case Not Known to VaCMS
The steps for entering a case not known to VaCMS include registration of a manual conversion application for the ADAPT case name (even though the application is not being manually converted). Complete file clearance and case association of all household members. Begin Data Collection, Intake/Screening, to include all household members on the case, and then deny the case through the Miscellaneous option on Left Navigation. Provide page-level or case-level comments to document the building and denying of the case is only so that a claim can be entered for a case not known to VaCMS.
Manual conversion applications are used for this process because these applications do not display on the SNAP AppTrack or the Pending Point in Time Report and are not considered in QA samples.
Below are the steps for entering a claim for a case not known to VaCMS:
From the Left Navigation, select Application / Screening and click Register an Application / Screening.
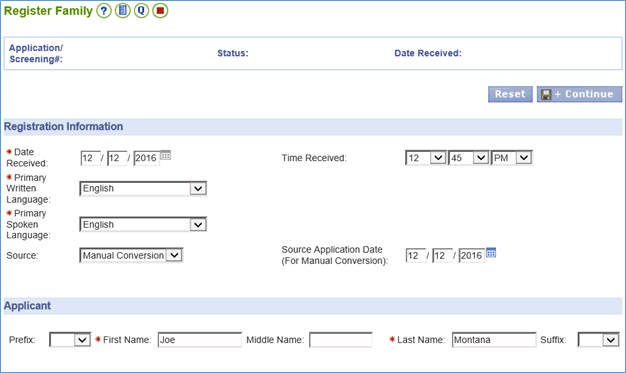
On the Register Family page, select Manual Conversion from the Source dropdown menu.
Note: The application is not going to be manually converted. Ultimately, the program will be denied after assigning the application to the worker. The application is registered with Manual Conversion selected from the Source field so that the denied program does not display in VaCMS reports and QA samples.
Upon selecting Manual Conversion from the Source dropdown menu, the Date Received field will populate with today’s day.
Enter today’s date for the Source Application Date, enter the case name of the person on the original ADAPT case in the Applicant section.
Select the corresponding programs for the case.
Click Save + Continue.
Complete the Register Address page and click Save + Continue.
Complete the Register Client page for the individual who is the case name.
Click Save + Continue.
On the File Clearance-Results page, select the radio button next to the appropriate Client ID listed under Potential Matches for the client. Click Next.
If no results are returned on the File Clearance-Results page, then click Next and continue to step 14 in this section.
After selecting a Client ID from the File Clearance-Results page and clicking Next, the File Clearance Associated Cases page displays. Under Cases Linked to, select the radio button next to the VaCMS case number with which you would like to associate the manual conversion application. For example, the SNAP application being manually converted to enter a claim in VaCMS may be associated to an open or closed MA case in VaCMS. Both SNAP, TANF, and MA programs can share the same case number.
Note: VaCMS will also ensure Child Care and Energy Assistance programs are not included on cases with any other programs.
Note: Refer to the Case Association QRG for more information about case association.
Assigned clients associated with the selected case will appear automatically in the Clients table. Check the boxes next to the clients who should be included in the new application if they are not already included. Click Select All to choose all clients at one time.
Note: Be sure to include all liable person(s) who were or should have been on the case at the time of the overpayment.
Click Add. Click Next.
On the Register Client-Summary page, click Add Client to add any additional clients to the application or click Next.
On the Register Program- Program page, confirm the information listed for the application is accurate and click Save + Continue.
On the Application / Screening- Summary page, enter a worker ID(s) in the Worker Assignment section and click Save + Assign to assign the application to the appropriate worker.
Go to Data Collection > Case Action.
If the application was not associated to an existing approved case in VaCMS, then enter the T# of the manually converted application and select Intake/Screening from the dropdown menu.
If the application was associated to an existing approved case in VaCMS, then enter the T# of the manually converted application and select Add Program from the dropdown menu.
On the Household Information page, click Save + Continue.
From Left Navigation, click on Miscellaneous>Program Denial to deny the program. Select the program from the dropdown menu. For the Denial Reason select Filed in Error. Click Add. Then click Submit.
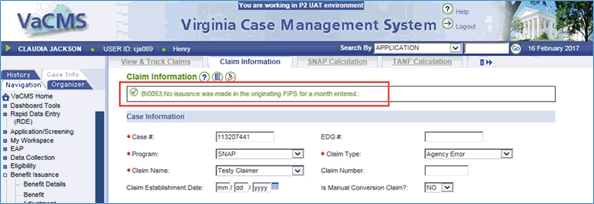
Next go to Benefit Issuance>Claims>View/Track Claims.
Complete the Claim Information page, click Save + Continue.
Note: Error message “BI0053: No issuance was made in the originating FIPS for a month entered” will display in green as a check to make sure this is the month(s) you want. Click Save + Continue again.
On the Overpayment Calculation page, enter the Household Size and the Benefit Amount for the month being calculated on the left-hand side of the calculation. Enter the new information on the right-hand side of the calculation and click Calculate. Click Add. Repeat this step for each month being calculated then click Save + Continue.
Complete the Liable Person page, adding each liable person to the claim, then click Save + Continue.
Complete the Claim Authorization page.
Click Submit.
Updated: 06/17/2017